|
I have been shooting a bow for at least 30 years, starting off with a little fiberglass limb longbow and blue wooden arrows. The only thing I knew about shooting a bow was that I had to grab the string, pull the string back, point the arrow where I hoped it would hit and let go. It didn’t always hit its mark, but it was fun to try. As I got older my Dad gave me his Darton Ranger 50# recurve bow. At 12 years old I was a novice in archery. I figured out on my own that I needed different arrows to shoot out of this stronger bow. I still shot the same way…grab the string, pull the string, aim and let go. However, I was becoming more accurate the more I shot the bow. I’ll never forget the time I shot my first “Robin Hood.” I thought I was the best archer out there. About 10 years ago I “kick-it up a notch” in bow hunting and began using a compound bow. I tried using a release but could never get use to it, so I continued using my fingers. I was under the impression that you had to use a release aid with a compound, because everyone else did it this way. To me “finger shooting” is a very comfortable position and I prefer the Mediterranean style release. The Mediterranean release in my findings was used the English and Eskimos. This was accomplished by using the first 3 fingers, assisted by the thumb, to draw the string, while the arrow rests between the first and second finger and the string is held in the crease of the first knuckle. To release the arrow, just relax your fingers that hold the string. I began reading about different releases and discovered that there were several types of finger style release names that dated back hundreds of years. In my “History Lesson” I discovered the Mongolian release, Mediterranean release, Apache release, Yahi release, tertiary release, the Primary and Secondary releases. Of course the Japanese were the first to design a glove to aid in pulling the string of a bow. In early history the bow stings were drawn by release aids as well. There were the release rings, which were placed on the thumb and use to keep the string from digging into the skin. Today most archers, that
are “finger shooters,” use either the Apache (3-under) or the
Mediterranean style (split-finger) release. When I started shooting the compounds, I have owned 3 different compounds and now I shoot the Renegade “NugeBow,” I stuck with the 3-finger method of drawing the string back. I have changed my anchor and now use my index finger in the corner of my mouth instead of my middle finger. I found this to be the best way for me to shoot now, and it helps me to see clearly through my peep site and keep a consistent form. The mechanical release
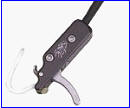
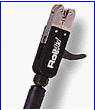
are used to hold the string while the bow is drawn. Then by means of a
“trigger”, the string is released and the arrow is shot. There are lots of
different releases aids on the market today. The caliper release aid seems
to be the most commonly used release. Others include rope releases and
roller type release. I normally recommend to people that have never shot a bow to use a Tru-Fire caliper release with a wrist strap, when they are just getting started.
I would have to say that the majority of all archers are using some type of release aid to avoid finger pinch. Finger pinch is usually caused by short axle bows having a greater angle of the string when pulled back to full draw and causes the string pinches the top and bottom fingers. I personally have never experienced this with the bows that I have owned, and two of those bows have had fairly short axle-to-axle lengths. The Renegade “NugeBow” has a 35-1/8” axle-to-axle and it doesn’t seem to cause any finger pinch.
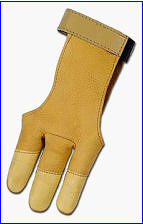
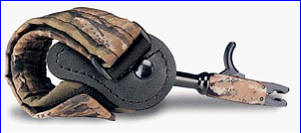
Most all “finger shooters” use a tab or a shooting glove. I use a glove made from leather and houses only 3-fingers. These gloves are made just for archery. I have used other gloves, to prevent the string from digging into my fingers that were made from wool, and knitted cotton, but the leather archery gloves works best. With practice any glove can be used as long as it has a non-stick surface…rubber beaded gloves do not work. If using the leather glove for hunting I would recommend that you get a cotton camouflage glove and cut the index, middle and ring fingers off and slip the camouflage glove over you hand. The camouflage glove with help cover and keep the wind off of your exposed skin. I like to use a tube style hand warmer, if it is really cold, to keep both hands warm as well.
Tabs are small and they don’t cover the fingertips like the glove does. Before hunting or shooting tournaments, you should shoot with the tab or glove for a few days to get it broken in. Usually it takes a couple of weeks to get the glove or tab to really get broken in. Try different products to see what you feel comfortable with then practice with it until you are proficient with it. Like anything else, when selecting a product for yourself, find something that you are comfortable with and what you like. Don’t get suckered into what someone else is comfortable with or likes. Happy Hunting and be safe in the woods!
|
 Your
anchor point is very important; it must be solid and consistent when the
bow is at full draw. Most of the time one of the fingers is the anchor.
When I started shooting a bow, the middle finger was my anchor and I
placed it in the corner of my mouth. This allowed me to “line up” my arrow
to its intended target. This method worked great for shooting my recurve.
Your
anchor point is very important; it must be solid and consistent when the
bow is at full draw. Most of the time one of the fingers is the anchor.
When I started shooting a bow, the middle finger was my anchor and I
placed it in the corner of my mouth. This allowed me to “line up” my arrow
to its intended target. This method worked great for shooting my recurve.


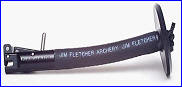
 These
releases are the easiest to use and very affordable even on a budget.
These
releases are the easiest to use and very affordable even on a budget.
 The
other advantage to a release aid is consistent arrow grouping, so I have
been told. A good finger shooter can also shoot consistent groups as long
as his form and release is consistent. I personally can shoot good
consistent groups, and have shot with other finger shooters that can do
the same.
The
other advantage to a release aid is consistent arrow grouping, so I have
been told. A good finger shooter can also shoot consistent groups as long
as his form and release is consistent. I personally can shoot good
consistent groups, and have shot with other finger shooters that can do
the same.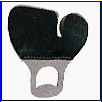 The
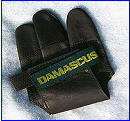
tab is a small piece of hide that is worn over the fingers. Usually a tab
has a hole, with or without a spacer that fits between the index finger
and the middle finger. The tab comes with or without hair. The hair
actually allows the string to have less friction when it is released.
The
tab is a small piece of hide that is worn over the fingers. Usually a tab
has a hole, with or without a spacer that fits between the index finger
and the middle finger. The tab comes with or without hair. The hair
actually allows the string to have less friction when it is released.